A food truck battery install is heavy mechanical work plus one licensed-electrician hookup — not aerospace. You bolt an inverter to the wall, mount a stack of LFP batteries next to it, run short DC cables between them, and tie the inverter's AC output into your truck's existing distribution panel.
Plan a solid weekend with a licensed electrician on-site for the panel tie-in and inspection sign-off. The DC plumbing and physical mounting is something a competent fabricator or shop can handle. Budget time for ventilation — inverters and batteries both put off heat that has to go somewhere.
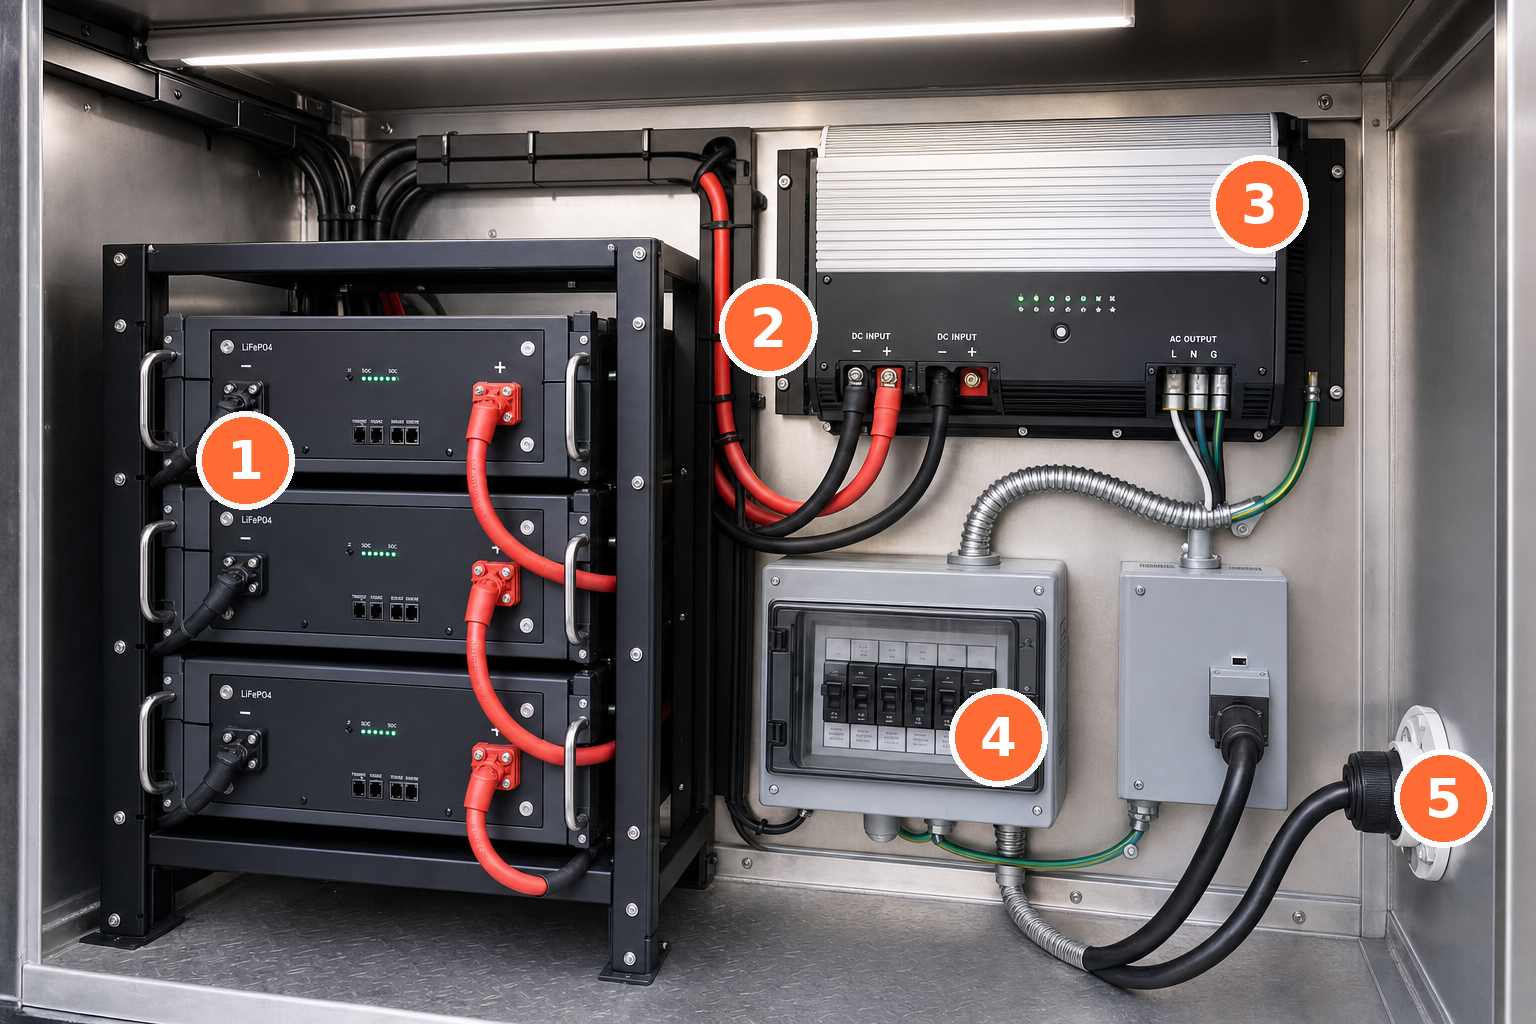
The Big Picture — What Goes Where
Four parts bolted together: inverter on the wall, battery stack next to it, short DC cables between, AC wiring into the truck's existing panel. Everything else is detail.
A food-truck battery system is four things bolted together: an inverter on a wall, a stack of batteries next to it, DC cables between them, and AC wiring from the inverter to your truck's existing distribution panel. That's it.
The cosmetic and physical work — picking the spot, drilling into a wall stud, lifting the inverter onto its bracket, stacking the batteries, running the cables through the wall — is genuinely handyman-level. The reason a licensed electrician is required for the final hookup isn't that the wiring is hard. It's that the work has to be inspected, code-compliant, and signed off by someone whose license is on the line. Insurance carriers ask. So do most municipalities.
Who Does What — The Short Version
A licensed electrician handles the AC tie-in and inspection sign-off. Mounting, DC cable runs, and ventilation cutouts are mechanical work — a fabricator or capable owner can do them.
Two skill levels are involved. Knowing which is which helps you supervise the job and know when you're being overcharged.
🔧 Handyman level
If you've hung a flat-screen, drilled into a stud, or run a few cables through a wall, you can do this part yourself. No special tools, no permit.
- ✓ Pick the inverter mounting spot (with airflow)
- ✓ Hang the inverter mounting bracket
- ✓ Lift the inverter onto the bracket
- ✓ Position the battery base on the floor
- ✓ Stack the battery modules
- ✓ Secure the stack to the wall (anti-tip brackets)
- ✓ Connect the battery comm cables (plug-in)
⚡ Licensed electrician
Anything that carries current at high amperage or ties into your truck's panel. Permit, inspection, sign-off — their work, their license.
- ! DC cables from battery stack to inverter
- ! Battery DC fuse / disconnect
- ! AC output wiring to distribution panel
- ! Shore-power inlet wiring (if new)
- ! Bonding and grounding
- ! Permit application and inspection sign-off
- ! Final commissioning and label-up
Step-by-Step Walkthrough
In order: plan the layout, mount the inverter and batteries, run DC cables short and fused, run AC from the inverter into the panel, ventilate, then commission. One weekend if the layout is decided in advance.
The actual order of operations on install day. The inverter goes up first because once batteries are wired in, you don't want to be moving things around.
Pick the inverter mounting location
Pick a vertical wall location with airflow. The inverter is air-cooled — it pulls air across heatsinks to stay alive. Manufacturer manuals call for several inches of clearance on every side and at least a foot above. Avoid direct sunlight, anywhere wet, and any spot blocked by cabinetry that traps heat. Mount on a non-combustible surface where possible (the inverter manuals require this for fire safety[1]).
Hang the inverter bracket
The mounting bracket is what holds the inverter. Find studs (or use the right anchors for the wall material), level the bracket, and screw it in. The brackets included with the inverters we recommend are designed for standard 12–16 inch stud spacing. Two people for the lift — these inverters weigh 90 to 130 pounds.
Place the battery base and stack the modules
The battery sits on the floor next to the inverter. Place the bottom base, then stack each module on top — typical food-truck stacks are two to four modules. Each module is 100 to 150 pounds, so this is a two-person lift. Once stacked, the wall-mount L-brackets on each module get screwed to the wall behind them so the stack can't tip in motion.
Hook up the battery communication cables
Each module talks to its neighbor and to the controller through a comm cable (looks like an Ethernet cable). They snap in by hand. You also set a small ID switch on each module so the system knows which one is which. The user manual that ships with the battery shows the order — it's plug-and-play.
DC wiring — battery stack to inverter
The DC cables between the batteries and the inverter carry serious current. They're sized to manufacturer spec, terminated with proper lugs, torqued to spec, and routed through a battery DC disconnect / class-T fuse. This is the highest-current wiring in the whole system and the place where mistakes have consequences. Hand it to your electrician.
AC wiring — inverter to distribution panel
The inverter has an AC output that ties into your truck's existing distribution panel — the same panel your fryer and refrigerator are already wired to. The electrician connects this with a transfer arrangement so the inverter feeds the loads when running off battery and shore power feeds them when plugged in. Most modern inverters have this transfer built in.
Grounding, bonding, labeling, and commissioning
Last step is the part you don't see. Proper bonding to the truck chassis, equipment grounding, code-compliant labels on every disconnect, and a powering-up sequence that brings the battery online, syncs the firmware, and verifies every safety circuit before your equipment ever sees a watt. Permit gets pulled, inspector signs off, you keep the paperwork.
Ventilation — Why the Inverter's Mounting Spot Matters
Inverters and batteries both shed real heat in a closed truck box. Mount them where air can move — not buried in a cabinet, not behind the fryer, not directly under the roof in summer sun.
This is the one spot on the truck where airflow actually matters for performance. The inverter is an air-cooled device. It runs internal fans that pull cool air through the heatsinks. When the air can't move, the inverter throttles back to protect itself — which means your equipment gets less power than the spec sheet says.
What ventilation actually means in practice
- ✓ Mount on an open wall, not buried behind equipment.
- ✓ Several inches of clearance on every side, more above.
- ✓ Out of direct sunlight (ambient temp matters).
- ✓ Non-combustible surface — concrete, steel, or fire-rated board.
- ✗ Not inside a sealed cabinet.
- ✗ Not next to the fryer or grill exhaust.
The certified inverters we recommend are built to UL 1741 — which sets specific thermal-protection and shutdown thresholds. The certification is what gives you confidence that the inverter will fail safely if something is wrong; the installation is what keeps it from getting that hot in the first place. More on what UL 1741 actually tests →
How the Battery Gets Recharged
Overnight at shore power through the inverter's built-in charger is the default. A solar MPPT input on the inverter is the optional second source. Onboard generators or alternator chargers are rare on food trucks and not necessary for normal operation.
You'll get this question from anyone you mention the system to. The honest answer for almost every food truck is the same: plug into shore power overnight at the commissary. Solar and alternator charging are real options that work for very specific cases, but they're not how the bulk of food-truck operators run.
Shore Power
Plug into a wall outlet at your commissary or kitchen overnight. The inverter has a built-in charger that refills the battery while you sleep. Same kind of cord-and-plug as an RV, scaled up.
Why it wins: dependable, fast, no extra hardware, runs while you're not using the truck.
Solar (rooftop)
The inverters we recommend all accept an MPPT solar input — adding panels later is plug-and-play. The honest math: a typical food-truck roof fits 600–1,500 watts of panels. On a sunny day that adds 3–8 kWh. Useful, but a busy truck uses 15–30 kWh in a shift, so you're still plugging in tonight.
Bottom line: add solar if you want to. Don't expect it to replace the nightly plug-in.
Engine Alternator
Charging from the engine while driving works in theory. In practice it requires a high-output alternator upgrade ($1,500+), a DC-to-DC charger, and several hours of drive time per shift to make a real dent — most food trucks don't drive that much.
Bottom line: niche — fits long-haul catering trucks, not most operators.
The Real Installation Manuals
Every reputable inverter and battery ships with a real installation manual. Read it before you start, follow the cable sizing and fusing tables exactly, and don't substitute parts the manual doesn't bless.
The diagrams above are simplified. When the day comes to actually install, your electrician will work from the manufacturer's full installation manual — and so should you, even if it's just to know what's coming. These are the documents the manufacturers publish for the equipment we recommend.
Inverter manuals
Your electrician should have these open during the install. Hand them over up front — it shortens their job and lowers your bill.
The Whole Job in One Paragraph
If you have to summarize the install: mount, wire, ventilate, inspect, commission. The rest is detail you'll find in the manuals.
You hang the inverter on a wall with airflow. You stack the batteries on the floor next to it and screw them to the wall so they don't shift while you drive. You snap the comm cables together. Then you call a licensed electrician to run the high-current DC cables between the batteries and the inverter, tie the inverter's AC output into your distribution panel, ground everything properly, pull the permit, and sign off the inspection. You charge it overnight on shore power. That's the whole job.
If you've made it this far, you're more prepared than most of the people quoting this work. Use that to your advantage when you talk to electricians — the ones who answer your questions clearly and give you a realistic timeline are the ones to hire.
Related Reading
If you found this helpful, these next pages go one layer deeper.
Free. No signup. Takes 3 minutes.